


Biosuit WIP
Re: Biosuit WIP
For me is important because i want the creative process of designing in 3D instead of 2D.

Re: Biosuit WIP
Small update, now it's a bit boring phase of adding more and more details, slowly getting into final shape. As usually, have a mix of Maya and Houdini work, some things passed a few forth - back stages, like current ''backpack prototype'' - draft is Houdini and my Mesh Blend HDA, later it was -topology in Maya, perhaps it will pass several more such phases when adding details to it - somehow found Houdini great for prototyping such things, while Maya is holding the all final work.
Just to share a network used for deformations. Everything related to this character is created in static pose, later is deformed by pairs of meshes, exported from Maya. So, static pose and mesh deformed by Maya rig at certain frame. Because it is Maya LT without Alembic, and final is still picture, I'm using good old, simple .obj files.
Of course I've tried factory SOPs before, like Cloth Capture or Point Deform, but they weren't suitable. Cloth Capture was accurate by prohibitively slow, even on short sampling distance, Point Deform was too ''loosely''. Both were not comfortable for blending.
Network is showing a sort of mix of polygon and point reference frame (in ICE naming) - XYZ Distance VOP is a kind of ''half" of ICE "get closest location'', telling from which primitive (polygon here), to sample the meshes, by bunch of ''primitive attribute" VOPs . (''UVs'' in ''primitive attribute" VOPs are determined by polygon edges, it's not what is usually considered as ''UV"). Important part are Normal SOPs before - once they are creating the normals on points (should be just that, on points), N in ''primitive attribute'' VOPs is interpolated, allowing a nice, smooth deformation. In case of not existing N attribute on points, or, in case of using ''primitive normal'' VOP, normals are *not* interpolated (that's close to ''Surface GeometricNormal" in ICE).
Such network allows me to mix the smooth deformation for clothing together with rigid deformation for eyes, helmet, backpack, ray gun. All that using only one skinned mesh in Maya. In case of rigid deformation, it's just one constant vector value used for sampling by XYZ distance VOP - on some place where just one Maya deformer has a full weight, like chest or head bone.
Re: Biosuit WIP
Introductory work on hair... I'm planning to have some braids here. In similar way with ICE, strands will be completely guided by geometry. Not hard to get a basic braids pattern, as it is repeating, same pattern for every element. However found somehow hard to model the tight 'packing', really important for realistic look . So here's little setup that utilizes Houdini Cloth. To avoid tons of screenshots, here is entire setup. It has a custom Houdini 'strand generator', able to go to more than three elements, theoretically it's able to create entire carpet - while odd number of yarns somehow works better in that case. Simulation part is Houdini cloth, mixed with Geometry VOP.
Geometry VOP is not-so-well-known Houdini feature, basically it's custom solver in form of VOP that lives in DOP network, able to do similar things like custom simulated ICE tree. So that's reason for having a "Blend Solver" in DOP network, this one ( with default settings) is there just to allow more than one solver. Here, Geometry VOP creates a custom "target force" ( force = some arbitrary vector added to velocity), looking at 'pushed' copy of initial geometry. Houdini cloth is utilized mainly to create self collisions, all parameters for keeping the cloth shape are lowered. Generally I'd always prefer Geometry VOP instead of H SOP Solver for these special tasks, simply because it allows me to utilize existing H solvers, no need to build self collisions and such. Drawback is, if I'm correct, that Geometry VOP is not synced with sub steps of Cloth solver, so I had to practically disable sub-frame sampling of H Cloth solver. Entire thing needs a bit longer simulation without speedy movements, to avoid skipping of some collision.

Geometry VOP is not-so-well-known Houdini feature, basically it's custom solver in form of VOP that lives in DOP network, able to do similar things like custom simulated ICE tree. So that's reason for having a "Blend Solver" in DOP network, this one ( with default settings) is there just to allow more than one solver. Here, Geometry VOP creates a custom "target force" ( force = some arbitrary vector added to velocity), looking at 'pushed' copy of initial geometry. Houdini cloth is utilized mainly to create self collisions, all parameters for keeping the cloth shape are lowered. Generally I'd always prefer Geometry VOP instead of H SOP Solver for these special tasks, simply because it allows me to utilize existing H solvers, no need to build self collisions and such. Drawback is, if I'm correct, that Geometry VOP is not synced with sub steps of Cloth solver, so I had to practically disable sub-frame sampling of H Cloth solver. Entire thing needs a bit longer simulation without speedy movements, to avoid skipping of some collision.
Re: Biosuit WIP
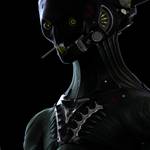
Now I think it's more or less defined design. Added hair and few more details. Played with huge counts of curves in Houdini after more than year, have impression that everything is really really faster. Or it's just a new machine ;;). Of course such hairdo, perhaps human hair at all, it is almost ideal task for procedural, SIMD style of evaluation. A lot of repeatable patterns of simple basic element, no any ''topology'' change, everything defined by relative simple math.
In any case, today it seems to be possible to edit in enough 'pleasant' way, a full wig of 100 - 150 K hairs, using a custom set of routines created over visual programming system, all that on home machine. Thing in pic shows around 50k, btw.
Had a less luck with ''collar'', which is only thing that uses some form of cloth simulation. Had to switch to Houdini Wire solver for that. While this one is slower than H Cloth for such tasks of connected wires ( btw H Wire solver works on meshes, too), it was able to output a way nicer folding, still artificially invoked by turbulence noise, mapped by uv, used as custom force.
Re: Biosuit WIP
What is the "collar", the stuff around her neck inside the bubble helmet?
Re: Biosuit WIP
Yep, and that's only 'utilized' simulation here.Bullit wrote:What is the "collar", the stuff around her neck inside the bubble helmet?
Re: Biosuit WIP
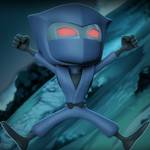
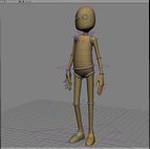
So here's my first character created in Houdini  . That's robot, basically it's only concept and main shape done in H, rest is Maya. Anyway somehow I like it, as rare case when I just 'got' some shape, playing with my Mesh Blend HDA, then actually later I've figured that 'thing' reminds me to voluminous 50s or 60s style SciFi robots, so decided to proceed with all re-topology and details in Maya.

Re: Biosuit WIP
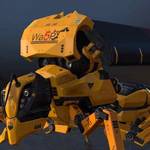
That's first test render, just to start with something. Last time I used H14 for rendering in Houdini. Now with H16, impressions about Mantra and Houdini are more or less same. Great renderer and app when it comes to anything 'unusual': has things like cylindrical curve shading that even with PBR, looks exactly like real geometry (well at least with size around one pixel), has built in curvature map shader (anyway too slow, so made curvatures in geometry network), has usable point/dust rendering, great volume rendering, great dealing with normals in VOPs, of course it can take any attribute into shader VOPs.....
....but when it comes to 'ordinary' things like MR style Ray Switcher, entire joy turns out in almost impossible long chain of changes deeply into shaders, so, nothing of my optimistic idea to use primary rays 'at will' elegantly leaving everything else rays to Mantra PBR rules. Also, it seems they have somehow simplified vision of shader component mixing and conserving energy, for small example, H16 variance of Skin shader seems to just add the 'Fresneled and energy-conserved by self' reflection on top of additive of three sss-something shaders, making an undesired burnout of highlights, some sort of yellow reflection instead of desired blue-ish, *and* it's
making fireflies at surface overlaps, so, had to re-construct the diffuse-sss-reflection component mixing (which is btw an another chain of Maya style A-can-go-with-B-only-if-C-is-applied-before-D). Generally, I went back to good old single scatter SSS from times of H 14, and good old Mantra Surface (now this is 'classic' shader). 'Principled' shader with its 'descriptive' parameters is looking too optimistic for Mantra sampling possibilities, and generally is like toy for anyone who grew up with something serious like vRay, and had to fight with MR. And yeah, 'reputation' of authors makes that 'Principled' thing even worse - from what I've heard, authors are a few facilities who never ever rendered realistic character, not even realistic car.
Long story short, shading and rendering wise, I'm pretty sure I'll be going a way faster and smoother with let's say Cycles and Blender. Anyway, it's still "lovely" Houdini.. weirdo.. in game. Hope I'll have the time to develop a bit more original look than this one. Summer is long...

Re: Biosuit WIP
Mathaeus comment about HDA is exaggerated. Generally it's as simple as 2 click.
Yes if you wan't a full controlable parameter interface it's a little more complicated than ICE but it's not that far.
Yes if you wan't a full controlable parameter interface it's a little more complicated than ICE but it's not that far.
Bullit wrote:Mathaeus wrote:Well as you mentioned 'sharing', I'd say yes and no.Bullit wrote:Does Houdini have compounds to share like Softimage ICE? The question popped up when Mathaeus wrote about deform by UV.
Yes: There is an equivalent of ICE preset manager window, so you are able to drag drop a custom HDA (Houdini Digital Asset) into network.
No: Creation, managing and sharing, that's a way more complex than ICE or Fabric, which must be great if there is dedicated TD in facility, so much more options and all that. However it's a way harder to manage, much easier to do something wrong, for example, I've managed to mess-up few factory HDAs while ago, so had to re-install Houdini to fix. Parameters are linked by expressions, not always by plain connect, so, copy paste of some nodes from one HDA to another, results in zeroed parameters. Evaluation is not same when you're into HDA or out. Finally, installing HDA from Orbolt site, requires a bit of IT knowledge (at least it was few years ago).
As matter of fact, people on H sites prefers to share H scenes, much more than HDAs.
On positive side, copy-paste between scenes works flawlessly, for much wider range than ICE (as (almost) everything in H is 'networked'). Personally I'm trying to avoid HDAs in favor of many smaller, per object networks. For possible systems of compounds, I'd prefer Fabric, which here offers a real multi-platform, together with robust and simple, ICE style of managing.
Thanks Mathaeus. Hope they can improve that. It was amazing the ease of sharing effects in ICE.
Re: Biosuit WIP
Well just for nit picking , when it comes to getting a new, ''fresh" HDA, generally I'm following procedure described by one of Houdini gurus, somewhere on forums, which seems to be a way more than just a few cliks. In any case, procedure is much longer, more dangerous and complicated than in Fabric and, perhaps, other upcoming visual programming systems.
So here's how it is going in H:
"The way I do it is to not unlock the original asset at all but make my own copy first with the Operator Type Manager and put either in my sandbox directory (any directory that you do test stuff in or desktop which is the new /tmp ), add that and edit that.
1. RMB on node and choose “Operator Type Manager…”.
This opens up the Operator Type Manager with the given node highlighted.
2. RMB on the selected operator definition in the Operator Type Manger and choose the “Copy…” option.
This opens up the create new asset definition pop up widget to give your asset a new name and label. Definitely give it a unique new name and unique new label. In tab menus, it's the label that determines the sorting so I add suffix (after name) to identify uniqueness but still shows up with the original version.
3. Give your asset a new name and label along with a directory location and file name with a .hda extension. Then press Accept.
Now add your new node to the same network. MMB on the node to verify that it is your new defined node in the directory that you saved it in with the correct file name.
Unlock and edit away. "
Re: Biosuit WIP
Thanksmc_axe wrote:Dayum nice detail
Basically I have one Maya file with everything related, from rigged models to all pieces of suit, I'm doing material assignments in Maya too . Houdini part is combining and deforming the things from loaded obj files (name of Maya Shading group is recognized as material name in H - for same with SI is SI cluster name plus material name). That Maya part is huge help, to recognize things visually. Transition wise, Maya is going somehow much better than I've expected, at least with fundamentals of 3d, like rigging and modeling. There's a sort of 'zBrush feel', of not so well organized software, but easy to 'get in flow'. In any case, after less than one year of really intensive usage, seems to be possible to 'get focus on creation', mainly thinking of *what* I want to do, not *how*.
Anyway here's last night trial. This time I've added a classic directional light together with environment map (first one is only environment map). While I have a custom envmap generator in H, able to create a precise HDR contrasting, from values around 60 - 80 to bellow 1, and Mantra is really good with sampling that chalenges, envmap lighting alone is still dispersed too much for my taste (nothing wrong with Mantra, here). By the way, 60 - 80 are HDR values where Mantra is able to do significant hair highlights or such, from plain envmap.
For now, my main concern is boring 'old fashion diving suit' coloration, I want something lighter, just for change. But it seems I'll need to go with radical changes in colors for something like that. Will see..

Re: Biosuit WIP
Hehe,
Well, you're describing a very specific workflow about modifying directly a factory node and without wrapping it so yes overwriting it has consequences...
Previously I was speaking about what we do generally in ICE with compound, we select the node, create compound , save, done. Reuse later
In Houdini you select the node, click asset/new digital asset from selection, save, done...
Plus you have the option to use the gallery, I tend to use it instead of HDAs. Generating a gallery item is super easy, you just have to drag/drop nodes to save it or to use it.
Plus generating a gallery item creat automatically a new "preset". For example if you're modifying the transform node, adding expressions to auto center by COG for example, you generate a gallery item to reuse later, then you'll also get a node preset generated automatically when houdini starts ;-)
Mathaeus wrote:Well just for nit picking
So here's how it is going in H:
"The way I do it is to not unlock the original asset at all but make my own copy first with the Operator Type Manager and put either in my sandbox directory (any directory that you do test stuff in or desktop which is the new /tmp ), add that and edit that.
1. RMB on node and choose “Operator Type Manager…”.
This opens up the Operator Type Manager with the given node highlighted.
2. RMB on the selected operator definition in the Operator Type Manger and choose the “Copy…” option.
This opens up the create new asset definition pop up widget to give your asset a new name and label. Definitely give it a unique new name and unique new label. In tab menus, it's the label that determines the sorting so I add suffix (after name) to identify uniqueness but still shows up with the original version.
3. Give your asset a new name and label along with a directory location and file name with a .hda extension. Then press Accept.
Now add your new node to the same network. MMB on the node to verify that it is your new defined node in the directory that you saved it in with the correct file name.
Unlock and edit away. "
Re: Biosuit WIP
Actually it was about *my* nodes.....NNois wrote:Hehe,
Well, you're describing a very specific workflow about modifying directly a factory node and without wrapping it so yes overwriting it has consequences...
But, yeah I have to admit that, after three years, somehow I did not fell in love with that workflow. Looks like a set of great possibilities for pipeline, but also I've experienced things like two SOPs saved in one HDA with completely different name, local per file install where certain HDA appear in one file and not in another one, so on.
All that by my fault, of course, but anyway, let's go a bit further of me, me, me, me, and my skill - imho real question is, how all that works in hands of let's say proficient artist, who's not having any positive attitude toward HDA organisation and such great subjects. From my little experience with acceptation of ICE, and little bit of H, answer is : it doesn't work at all.
While system like let's say Fabric, gives a way nicer ways to give to both sides, coder and artist, what they want, imho. Some people simply do not want that "Houdini way", that's all I wanted to say. While again, with something like Fabric, it can go as just another set of more or less standard Maya nodes.
Re: Biosuit WIP
Hi Mathaeus,
Yeah I understood all that of course.
I love your very good work, your talent, and, because of that you have a big voice here so I just wanted to be the little devil's advocate about houdini which I think is not that bad and is a very good replacement for softimage for some people ;-)
By the way can we see some of your work on fabric on a forum or something ?
Re: Biosuit WIP
Thanks for nice words.NNois wrote:Hi Mathaeus,
By the way can we see some of your work on fabric on a forum or something ?
Not really, my ability to post on forums and my freedom of speech
This weekend is dedicated to background of pic, created in Houdini, of course. Stones, sand waves (if I'll find some feasible way to get that pattern) and such things.
Who is online
Users browsing this forum: No registered users and 18 guests